Are you struggling with limited security and connectivity while browsing the internet or working remotely? The Windows built-in VPN (Virtual Private Network) is a powerful, often overlooked tool that can provide an enhanced level of security and a more stable connection. This guide will walk you through how to activate, use, and optimize the Windows built-in VPN, giving you practical solutions to common connectivity and security issues.
Unveiling the Hidden Advantage of Windows Built-in VPN
The built-in VPN feature in Windows OS is a versatile tool that not only secures your internet connection but also helps bypass geo-restrictions, ensuring that you can access content securely from anywhere in the world. However, many users remain unaware of this functionality, missing out on its full range of benefits. This guide aims to shed light on how to effectively use the Windows VPN, addressing the pain points of security vulnerabilities and connectivity issues.
Quick Reference
Quick Reference
- Immediate action item: Enable the Windows built-in VPN to start securing your internet connection right away.
- Essential tip: Regularly check your VPN settings to ensure you’re connected to a reliable server.
- Common mistake to avoid: Forgetting to disconnect the VPN when you’re done using it, which can slow down your internet connection.
Activating the Windows Built-in VPN
Activating the VPN on your Windows device is straightforward, and this section will take you through the process step-by-step.
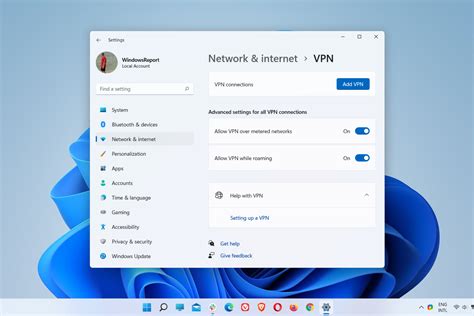
First, you’ll need to open the Settings app. This can be done by pressing Windows + I keys on your keyboard. Navigate to the Network & Internet section.
In the Network & Internet menu, locate the VPN tab on the left sidebar and click on it. You’ll see an option to Add a VPN connection.
Click on this option and fill in the necessary details. You’ll need:
- VPN provider: Select Windows (built-in)
- Connection name: Enter a descriptive name for easy identification
- Server name or address: Enter the server address provided by your VPN service
- VPN type: Choose the type of VPN your provider uses (PPTP, L2TP/IPsec, SSTP, IKEv2)
- Type of credentials: Enter the username and password provided by your VPN service
Once all the fields are filled, click Save to add the VPN connection.
Connecting to a VPN Server
After activating the VPN, connecting to a server is the next step. Here’s how you can ensure a smooth connection:
Navigate back to the VPN tab under Network & Internet settings. You will see the VPN connection you just created listed there. Click on Connect.
If everything is configured correctly, your VPN will establish a connection to the selected server. You should see a VPN icon in the system tray indicating that the VPN is active.
Remember, always verify your connection status to ensure you are securely connected. You can do this by checking your IP address through a reliable online service.
Optimizing Your Windows VPN Settings
To make the most out of the Windows built-in VPN, there are several settings you can tweak to optimize its performance. Below are key areas to focus on:
Choosing the Right VPN Server
Selecting the right server is crucial for optimal performance and security. Here’s how to choose wisely:
- Proximity: Connect to a server closest to your physical location for faster speeds.
- Load: Choose a server with the least traffic if you’re experiencing slow speeds.
- Security features: Prefer servers that offer better encryption and security protocols.
To change servers, go to your VPN settings and select a different server from the list provided.
Configuring VPN Protocols
The VPN protocol determines how secure and efficient your connection is. Here’s how to configure it:
- PPTP: Offers decent speed but less secure; suitable for simple tasks.
- L2TP/IPsec: More secure but can be slower; good for general use.
- SSTP: Fast and integrates well with Windows; offers good security.
- IKEv2: Balances speed and security; highly stable on mobile devices.
To change the protocol, go to the VPN settings under the Advanced options.
Adjusting Kill Switch and Split Tunneling
Enhance your security with these advanced features:
- Kill Switch: Automatically disconnects your internet if the VPN fails, preventing exposure.
- Split Tunneling: Allows selective routing of traffic through the VPN and directly through your ISP.
Enable these options in the advanced settings of your VPN configuration.
Practical FAQ
Why is my VPN connection dropping frequently?
VPN disconnections can occur due to several reasons:
- Server Overload: The server you’re connected to might be overburdened. Try switching to a less busy server.
- Internet Stability: Ensure your regular internet connection is stable. Poor broadband can lead to dropped VPN connections.
- Firewall Conflicts: Sometimes, your device’s firewall settings may interfere with the VPN. Check and adjust firewall settings to allow VPN traffic.
If the problem persists, consider contacting your VPN service provider for further assistance.
Can I use Windows VPN to stream geo-restricted content?
Yes, using the Windows VPN, you can easily access geo-blocked content by connecting to a server in a country where the content is available. Here’s how:
- Choose a VPN server in the desired country.
- Connect to the VPN server.
- Open your streaming service (e.g., Netflix, Hulu, BBC iPlayer) and start streaming.
Note that some streaming platforms have started detecting VPN usage, so ensure your VPN service can bypass these blocks.
How do I ensure the highest level of privacy when using the Windows VPN?
To maintain the highest level of privacy, follow these tips:
- Use Strong Encryption: Opt for servers that support strong encryption protocols like OpenVPN with AES-256.
- No Logs Policy: Choose a VPN provider that strictly adheres to a no-logs policy.
- Double VPN: For an extra layer of security, consider using a VPN that offers double VPN routing.
- DNS Leak Protection: Ensure your VPN has DNS leak protection to prevent your real IP address from being exposed.
Regularly update your VPN software to the latest version for enhanced security features.
By following these steps and recommendations, you’ll unlock the full potential of your Windows built-in VPN, ensuring a secure, stable, and fast internet connection no matter where you are.