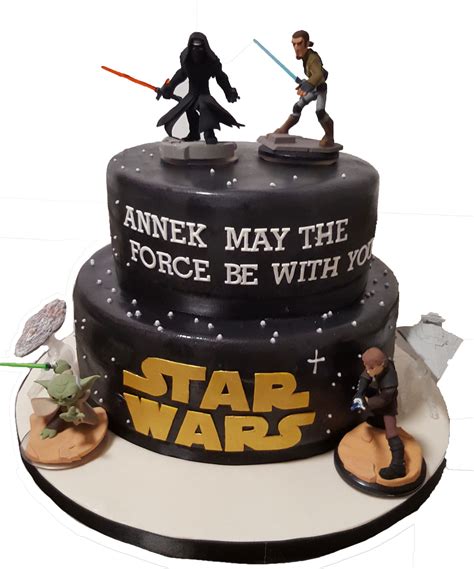
Are you a dedicated Star Wars fan looking to add a touch of galactic charm to your celebration? Creating a Star Wars cake design can be an exciting and rewarding project that showcases your fandom. This comprehensive guide will walk you through the entire process, from understanding the basic concepts to mastering advanced techniques. Whether you're celebrating a birthday, an anniversary, or just love Star Wars, this guide is designed to inspire and equip you with the knowledge you need to create a cake that will wow everyone at your event.
Why Star Wars Cake Designs Are Perfect for Celebrations
Star Wars cake designs are a fantastic way to bring the universe’s iconic characters, planets, and ships to life. They’re not only visually stunning but also deeply meaningful for fans. By incorporating Star Wars elements into your cake, you’re creating a personalized tribute that captures the essence of the saga. These designs add a layer of fun and excitement to any celebration, making it memorable for everyone involved.
Quick Reference Guide
Quick Reference
- Immediate action item: Start by gathering inspiration from Star Wars fan forums and online communities to get a variety of ideas.
- Essential tip: Use fondant for most designs to achieve smooth, detailed shapes, especially for intricate characters and vehicles.
- Common mistake to avoid: Rushing the decorating process can lead to mistakes; take your time to ensure precision.
Beginner’s Guide to Creating Basic Star Wars Cake Designs
For those new to cake decorating, starting with basic designs can help you build confidence before tackling more complex projects. Here’s a step-by-step guide to create some easy yet impressive Star Wars cake designs.
Step 1: Selecting Your Cake Base
Choose a cake that suits your design. For a simple Star Wars cake, a classic two-layer cake works well. Opt for chocolate or vanilla as these flavors pair well with any decorations. Make sure your cake is even and level to prevent decorating issues.
Step 2: Preparing the Cake Surface
Once your cake layers are cool, level them if necessary and cover the entire cake with a smooth layer of buttercream or cream cheese frosting. This base will provide a clean surface for your decorations.
Step 3: Creating Simple Shapes
Begin with simple Star Wars elements like the Millennium Falcon or a Star Destroyer. For the Millennium Falcon, use fondant or rolled sugar paste to create a detailed, pointed nose and wings. Attach this piece on top of the cake using a small dab of glue. For a Star Destroyer, you can create a base from a large, flat circle of fondant and add a detailed top turret and smoke plume.
Step 4: Adding Details
Use gel food coloring to paint small details like stars on the backdrop or tiny lights around the windows of your Star Wars vehicle. A tiny brush works best for these fine details.
Step 5: Final Touches
Finish your cake with a glossy, clear edible top coat to protect your decorations and give them a polished look. Place your cake in the fridge for about 10-15 minutes to set the coating before placing it on display.
Advanced Techniques for Stunning Star Wars Cake Designs
For those ready to elevate their Star Wars cake designs, here’s a more detailed guide to create intricate and stunning masterpieces.
Step 1: Designing Your Concept
Sketch your idea first. Whether it’s an epic battle scene with characters or a detailed replica of a ship, having a clear design helps you visualize the final product. Use detailed Star Wars reference images to guide your sketches.
Step 2: Creating Fondant Figures
To bring your characters to life, you’ll need to create fondant figures. Start by making a basic fondant base and then shape it to form your character’s outline. Use tools to sculpt facial features and clothing details. Flatten small pieces of fondant for accessories like lightsabers and helmets.
Step 3: Assembling Detailed Models
Combine fondant pieces carefully to create your models. If you’re building a ship like the Death Star, construct the large base from a single layer of fondant and attach detailed parts using edible glue or a mixture of gel food coloring and water. Ensure each piece is firmly attached and add tiny details like screws and rivets for realism.
Step 4: Painting and Finishing Touches
Use gel food coloring to paint scenes and details. Apply these on your cake with a fine brush or drop it directly on the cake if painting large surfaces. For characters, add tiny lights or LED strips underneath to create a glowing effect. Ensure to let all elements dry completely before final assembly to avoid smudging.
Step 5: Assembling the Final Cake
Place your cake layers on a sturdy cake board and set your fondant models around them or atop the cake. If it’s a detailed scene, use tiny wooden skewers to secure parts in place without damaging them. Finish with a glossy top coat to seal and highlight your work.
Practical FAQ Section
What tools do I need to start decorating cakes with Star Wars designs?
To start with Star Wars cake designs, you’ll need the following basic tools:
- Fondant rollers for rolling out thin layers of fondant
- Fondant cutters or small cookie cutters for shaping details
- Small brushes for painting fine details
- Edible glue for attaching fondant pieces
- A cake board to assemble your finished cake
- Offset spatulas and cake levelers for smoothing and leveling cake layers
Having these tools will make your decorating process smoother and help you achieve precise, professional-looking results.
Tips, Best Practices, and How-to Information
Here are some additional tips to enhance your Star Wars cake designs:
- Practice makes perfect: Before working on your actual cake, practice sculpting and decorating on a plain cake or a piece of scrap fondant.
- Temperature control: Keep your fondant at room temperature before rolling it out to make it more pliable and easier to work with.
- Layering technique: When creating detailed models, layer the fondant pieces one on top of another and smooth out each layer as you go to avoid bulky designs.
- Patience: Take your time with each step, especially when painting fine details. Rushing can lead to mistakes and uneven results.
- Experiment with colors: Use a mix of colors to create more lifelike designs. For example, use different shades of gray for spaceships or a range of blues and greens for characters’ uniforms.
- Use references: Always keep your Star Wars reference images handy for accuracy. Comparing your work with the original design helps maintain authenticity.
By following this guide, you’ll be well on your way to creating spectacular Star Wars-themed cakes that will delight and impress all Star Wars fans at your celebration. Happy decorating!