Are you in search of that perfect cake that's both delightful and practical for any occasion? Look no further! This guide will walk you through the art of crafting delicious star cake recipes that are sure to impress your family and friends. Whether you're a seasoned baker or a complete novice, these step-by-step guides and practical tips will ensure you achieve cake perfection. Let’s dive into the wonderful world of star cakes!
Why Star Cakes Are a Must-Try
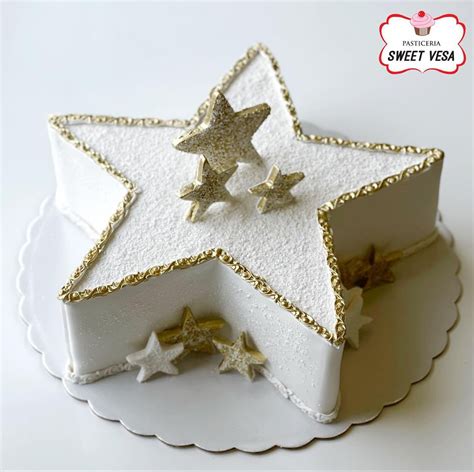
Star cakes are versatile, visually stunning, and extremely delicious. These cakes, with their intricate star designs, make every gathering or celebration extra special. They’re perfect for birthdays, weddings, and any festive occasion that calls for something extraordinary. What’s more, star cakes can be customized with various flavors and icing designs, allowing you to tailor them to your specific taste and event.
However, baking star cakes can seem daunting if you’re unfamiliar with the process. This guide aims to simplify the process, breaking down each step to make sure your star cake turns out beautifully, every time.
Quick Reference
Quick Reference
- Immediate action item: Start with a reliable cake recipe that ensures a moist and sturdy cake.
- Essential tip: Use a cake leveler to achieve perfectly even layers, which is crucial for the star design.
- Common mistake to avoid: Over-mixing the batter can result in dense cakes; mix just until combined.
Step-by-Step Guide to Baking the Perfect Star Cake
Baking the perfect star cake involves several detailed steps, from preparing the cake layers to decorating them into a stunning star. Here’s a detailed, practical guide to help you master this delightful dessert.
1. Preparing the Cake Layers
The foundation of any star cake lies in its layers. Let’s start by preparing these layers to ensure they’re perfect for sculpting into a star.
- Select a Cake Recipe: Choose a cake recipe that suits your taste. Classic vanilla, chocolate, and red velvet are popular choices. Make sure it’s a moist recipe, which is essential for the cake’s texture.
- Preheat the Oven: Preheat your oven to the temperature specified in your recipe—usually around 350°F (175°C).
- Prepare the Cake Pans: Grease and flour two 9-inch round cake pans or use parchment paper to line the bottoms for easier removal.
- Mix the Batter: Follow your recipe to mix the batter thoroughly, but do not overmix to avoid dense cakes. The batter should be smooth but with some lumps.
- Pour and Bake: Divide the batter equally between the two pans. Bake for the time specified in your recipe—typically 25-30 minutes. Use a toothpick to test for doneness.
- Cool the Cakes: Let the cakes cool in the pans for about 10 minutes, then remove from the pans and let them cool completely on wire racks.
2. Leveling the Cake Layers
To achieve the perfect star shape, you need evenly sliced cake layers. This process might require a cake leveler or a serrated knife.
- Use a Cake Leveler: A cake leveler is ideal for this step. Run it along the top edge of one cake layer to make it even. Rotate the layer slightly and repeat on the other side.
- Alternative Method: If you don’t have a cake leveler, use a serrated knife. Slice off the crust and any uneven parts until the top is even.
- Check the Thickness: Your layers should be about 1 to 1.5 inches thick. Any thinner and the star won’t hold together well.
3. Assembling the Star Cake
Now that your layers are perfectly even, it’s time to assemble them into a star. This process requires a bit of creativity and patience.
- Frosting the Layers: Apply a thin layer of buttercream or your favorite frosting on one even cake layer. This will act as the base for your star.
- Place the Second Layer: Place the second leveled cake layer on top of the frosting. Apply a thin layer of frosting on this layer as well.
- Creating the Star Shape: To form the star, cut out star-shaped pieces from each layer. Use a star cookie cutter or freehand with a knife. Cut these shapes from the two layers.
- Attaching the Pieces: Use additional frosting to attach the star pieces together. If you have smaller star pieces, attach them around the edges of the main star to give it depth.
- Refrigerate to Set: Refrigerate the assembled star for about 30 minutes to set the frosting and structure.
4. Decoration and Final Touches
Decorating your star cake can elevate it from just a cake to a showstopper. Here are some tips to make it look professional.
- Smooth the Frosting: Use a offset spatula to smooth out the frosting on all sides of the cake, ensuring it looks uniform.
- Add Color: Add color to your frosting for a vibrant cake. Use gel food colors or colored icing for a professional finish.
- Detailing: For added detail, use a piping bag with a small tip to add star-shaped borders, glitter, or fondant stars around the edges.
- Final Touches: You can also add fresh fruit, chocolate chips, or sprinkles to enhance the appearance.
Practical FAQ
Can I use any cake flavor for a star cake?
Absolutely! While vanilla, chocolate, and red velvet are popular choices for their classic appeal and versatility, you can use any cake flavor you prefer. Fruit cakes, lemon cakes, and even carrot cakes can make stunning star cakes if the batter is moist and sturdy enough. Just make sure to follow the same leveling and assembling techniques regardless of the flavor.
What if my star cake starts to crack?
Cracks in a star cake can happen, especially if the cake layers are not evenly sliced or if the cake is overbaked. To prevent cracks, ensure your cake layers are perfectly even before assembly. Also, handle the cake gently when slicing and assembling it. If your cake does crack, you can cover it with a generous layer of frosting to hide the cracks and still have a beautiful cake.
How can I make my star cake look more professional?
To achieve a professional look for your star cake, pay attention to detail and use high-quality ingredients. Smooth out the frosting neatly with an offset spatula, and consider adding some colored frosting or edible glitter for a vibrant touch. Use a piping bag for detailed decorations, and don’t hesitate to add fresh fruit or chocolate chips as accents. Finally, take a bit of time to practice your design techniques, such as piping stars along the edges or adding decorative borders.
There you have it—your comprehensive guide to making delicious star cakes that are sure to impress! With these step-by-step instructions, essential tips, and practical examples, you’ll be ready to bake a stunning cake for any occasion. Remember to experiment with different flavors and decorations to find your perfect star cake design. Happy baking!