Importing your browser favorites or bookmarks is a crucial task when switching to a new browser or cleaning up your digital life. Google Chrome, being one of the most widely used browsers, offers a straightforward way to import your favorites seamlessly. This guide will provide you with a comprehensive step-by-step approach to ensure that you can transition smoothly with your bookmarks intact, while addressing common pain points users face during this process. Whether you're a novice or an advanced user, this guide will walk you through every step to make the process as frictionless as possible.
Why Importing Your Bookmarks is Essential
Importing your bookmarks isn't just about preserving the links you've collected; it's about maintaining continuity and efficiency in your web browsing. Whether you're switching from Firefox, Safari, or Internet Explorer, or you’re just trying to set up a new Chrome profile, having your favorites in one place allows you to access all the important resources instantly without any manual search. This process also ensures that you don't lose track of valuable information, research notes, or any websites you frequently visit.
Quick Reference
Quick Reference
- Immediate action item with clear benefit: Export bookmarks from your current browser in HTML format.
- Essential tip with step-by-step guidance: Navigate to Chrome’s bookmark settings, open the “Import bookmarks and settings” option, and select your exported HTML file.
- Common mistake to avoid with solution: Not checking the “Bookmarks” checkbox during the import process can prevent the successful transfer of your favorites.
Step-by-Step Guide to Importing Bookmarks in Chrome
Whether you’re starting fresh or transitioning to Chrome from another browser, this guide will walk you through the process step by step.
Step 1: Export Bookmarks from Your Current Browser
The first step is to export your bookmarks from your current browser in a format that Chrome can read, typically HTML. Here’s how you can do this:
- For Firefox:
- Click on the Library button and select Bookmarks.
- Choose “Show All Bookmarks” and then click the “Import and Backup” button.
- Select “Backup” and save your file as an HTML document.
- For Safari:
- Open Safari and go to File > Export Bookmarks.
- Save the file as an HTML file.
- For Internet Explorer:
- Click on the Tools gear icon and choose “Internet Options”.
- Under the “Backup” tab, click “Backup…” and save the file as an HTML document.
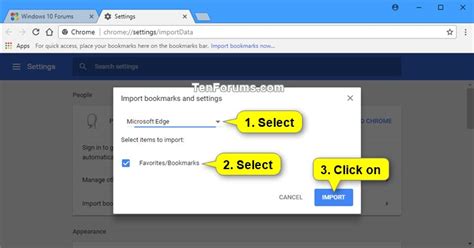
Step 2: Open Chrome and Access the Bookmark Import Option
Once you have exported your bookmarks from your current browser, it’s time to open Chrome and access the bookmark import option:
- Open Google Chrome and click on the three vertical dots in the upper right corner of the screen.
- Navigate to “Bookmarks” and select “Bookmark manager” from the dropdown menu.
- Click on the three vertical dots in the Bookmark manager and select “Import bookmarks and settings”.
Step 3: Import Your Bookmarks into Chrome
Now that you’ve opened the import option in Chrome, you can proceed with the following steps:
- In the “Import bookmarks and settings” window, ensure that the “Bookmarks” checkbox is checked.
- Under the “File” dropdown, select the HTML file that you exported from your previous browser.
- Click “Open” to import the bookmarks.
- Once the import is complete, you should see your bookmarks listed in the Chrome Bookmark manager.
Step 4: Organize Your Bookmarks in Chrome
After successfully importing your bookmarks, you might want to organize them to make navigation easier:
- You can create new folders by clicking on “Organize” and selecting “Add folder”.
- Drag and drop bookmarks into folders to place them where they belong.
- For further customization, you can also pin frequently accessed bookmarks to the toolbar for quick access.
Common Pitfalls and Solutions
While importing bookmarks into Chrome, you might encounter a few issues. Here are some common pitfalls and solutions:
- Issue: Bookmarks not appearing
Ensure that the “Bookmarks” checkbox was selected during the import process. If it wasn't, you will need to repeat the import process with the correct checkbox selected.
- Issue: Corrupted HTML file
If you suspect the HTML file is corrupted, try exporting the bookmarks again from your original browser. A fresh export usually resolves the issue.
- Issue: Missing bookmarks from specific folders
Verify the structure of the exported HTML file to ensure that all bookmarks and their respective folder hierarchies are intact. If not, you may need to manually reorganize within Chrome.
Practical FAQ
Can I import bookmarks from an older version of Chrome?
If you are importing bookmarks from an older version of Chrome, it might already be in HTML format. However, you can also try exporting the bookmarks directly from Chrome via the “Bookmark manager” by clicking on the three vertical dots and selecting “Export bookmarks”. Import them using the same method we described in the guide.
What if I don't have an HTML file but just have bookmarks in a different format?
If you don’t have an HTML file, first export your bookmarks in the format provided by your current browser. If another format is available, you may need a third-party tool to convert it to HTML. However, most modern browsers directly support exporting bookmarks in HTML, making it the most universal format.
Is there a way to import bookmarks from other cloud services like iCloud?
If your bookmarks are synced through a service like iCloud, you can usually find an option to export them directly in HTML format. Navigate to your service settings to find the export option. Once exported, follow the same import steps outlined in this guide for Chrome.
This detailed guide aims to provide you with all the necessary steps and tips to seamlessly import your bookmarks into Chrome. By following these instructions, you will minimize disruption to your browsing habits, ensuring a smooth transition to Chrome with all your important links in place.
Whether you are looking to maintain your browsing experience across different platforms or just manage your Chrome browser more effectively, these steps will help you do it effortlessly. Start implementing this guide today to see the difference!