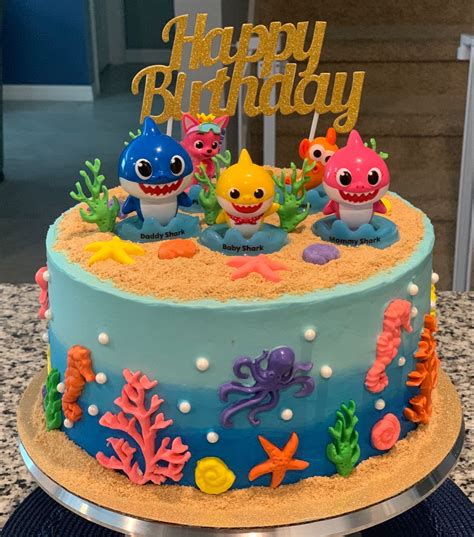
Throwing a memorable birthday party for your little one? Planning an enchanting Baby Shark cake can turn the celebration into an unforgettable splash of fun! Here’s your comprehensive guide to crafting delightful Baby Shark cakes that will have your kids roaring with joy and their friends asking for a piece of the magic. From understanding the basics to diving deep into detailed ideas and solving common challenges, this guide covers it all.
Why Baby Shark Cakes are a Hit for Kids’ Birthdays
Baby Shark has taken the world by storm, especially among young children. Cakes featuring this lovable character are a fantastic way to blend entertainment with dessert, making the birthday party a grand success. They captivate kids’ attention, making them the center of the party, and provide an easy-to-understand theme that can be extended into games, decorations, and other party elements. A Baby Shark cake can be a huge hit as it taps into the current popular culture, providing endless fun and excitement.
Quick Reference Guide: Essential Baby Shark Cake Tips
Quick Reference
- Immediate action item: Choose cake flavor based on the birthday child’s favorite food to ensure everyone enjoys it.
- Essential tip: Use edible glitter or tiny Baby Shark stickers for that extra magical touch.
- Common mistake to avoid: Over-frosting or under-frosting, which can ruin the structural integrity or make it too sweet.
Step-by-Step Guide to Creating Your Perfect Baby Shark Cake
Creating a Baby Shark cake might seem daunting, but with some patience and creativity, it can be done with joy and ease. Here’s a detailed, step-by-step guide to help you:
1. Gather Your Supplies
Before you begin, gather all necessary ingredients and tools. Here’s a list to get you started:
- Two 9-inch round cake pans
- Basic cake recipe (chocolate, vanilla, or any flavor preferred by the child)
- White and yellow buttercream frosting
- Edible glitter, Baby Shark cutouts, or stickers
- Food coloring (to tint frosting)
- Small tools like spatulas, piping bags, and cake leveler
Start by ensuring you have all your supplies in one place to streamline the process.
2. Prepare Your Cakes
Here’s how to bake the cake:
- Preheat your oven to 350°F (175°C). Grease and flour your cake pans.
- Mix your batter. Follow your chosen cake recipe carefully. For example, for a vanilla cake, mix 2 cups of flour, 1 cup of sugar, ½ cup of butter, 1 cup of milk, 3 eggs, and 2 teaspoons of vanilla extract.
- Divide the batter evenly between the two cake pans. Smooth out the tops.
- Bake the cakes in the preheated oven for 30-35 minutes or until a toothpick inserted in the center comes out clean.
- Let the cakes cool completely in the pans for about 10 minutes, then remove them from the pans and transfer to a wire rack to cool completely.
3. Assemble the Cake
Once your cakes are cool, it’s time to frost them:
- Level the cakes if necessary using a cake leveler to make them as flat as possible.
- Frost the cakes. Start with a thin layer of white buttercream to adhere the layers together. Use a higher amount of buttercream to cover the entire cake with a smooth, even layer.
- Freeze the cake for about 30 minutes. This helps the buttercream set and makes it easier to work with.
- Add decorative elements. Now comes the fun part – creating the Baby Shark!
4. Design Your Baby Shark Cake
Here’s how to give your cake its iconic look:
- Divide the top of the cake into two pieces: the head and the body. Using a knife, cut straight down the middle.
- Shape the head. Use the top half to make the head, shaping it slightly larger than the body.
- Decorate the head. Use yellow buttercream to outline Baby Shark’s face. You can draw his big eyes, wide smile, and small teeth using food coloring. Add white buttercream for his hair.
- Create the fins. Use small triangles of yellow frosting to cut out Baby Shark’s fins and place them on the side of the head.
- Add the body. Frost the bottom half to resemble the body. Decorate it similarly to the head, but without the face.
- Use edible glitter or stickers to add sparkle and finish off the cake with a magical touch.
5. Final Touches
Here are some final touches to elevate your Baby Shark cake:
- Use mini Baby Shark cookie cutters to make small cupcakes or party favors.
- Arrange the cake in a decorative cake stand to showcase it.
- Consider adding Baby Shark-themed table settings or balloon decorations to match the cake theme.
Practical FAQ: Troubleshooting Common Cake-Making Challenges
My cake didn’t rise properly, what should I do?
If your cake didn’t rise properly, it could be due to several reasons:
- Expired baking powder or baking soda
- Under-mixing the batter which didn’t allow air bubbles to form
- Oven temperature too low
Solution: Always check your leavening agents for expiration, make sure to mix just enough to incorporate ingredients without over-mixing, and confirm that your oven is calibrated correctly.
How can I make my frosting hold the shape better?
To make your frosting hold better:
- Chill the butter before using it to make the frosting firm
- Add a bit of gelatin to the frosting to increase its stability
- Pipe or spread the frosting while it’s cold
Using these methods can help your frosting hold up beautifully, ensuring your Baby Shark cake looks as good as it tastes.
Expert Tips for an Amazing Baby Shark Cake
Here are some additional tips from cake design pros to make your Baby Shark cake the star of the show:
- Use high-quality ingredients for the best flavor and texture.
- Take your time with decorations – rushing can lead to mistakes.
- Practice makes perfect. If you’re new to cake decorating, try a smaller project first.
- Get creative with colors and decorations. Adding personal touches can make the cake extra special.
- Consider professional help if you’re unsure about the design – many bakeries offer custom cake designs.
With this guide, you’re well-equipped to create a fantastic Baby Shark cake that will make any kid’s birthday party memorable. Happy baking!